Sunday, December 2, 2018

Using pfSense As My Home Router - Part 1

Background


I have gone through multiple wireless routers. I have used Linksys, Netgear, ASUS, Buffalo, TP-LINK, and more. I have noticed that Linksys and Netgear often ship with very buggy firmware, and they often slow down and stop routing traffic. I am then required to restart them.

As a case in point, I recently returned a Netgear R6900 to Costco, because I had to restart it every 48 hours. To verify was not the only one, I did a Google search and found a forum entry of thousands of people that are having the same issue at https://community.netgear.com/t5/Nighthawk-WiFi-Routers/R7900P-dropping-internet-requiring-reset-every-few-days/td-p/1450152.

Having experienced so many issues, I decided to build my own physical router. It would not handle wireless traffic. It would only handle routing traffic from my home network to the Internet. Then, I would use my existing wireless routers purely as access points. They would connect wireless users to the network, but they would not handle any routing.

Hardware


They first step I took was to invest in a mini PC. I searched www.aliexpress.com for a good firewall-based computer. I wanted a computer that had four network cards. One would be used to connect the computer to the Internet. Another one would be dedicated for routing VPN traffic. The last two would be bridged, acting as a switch, and connected to my home network.

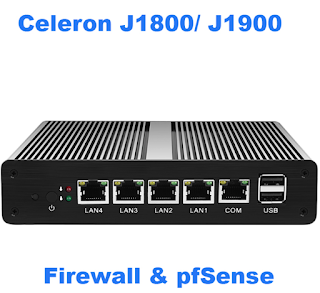
I searched www.aliexpress.com for mini PC and I found one that I liked. It contained a Celeron J1900 processor, 4 gigabytes of RAM, and a 32 gigabyte SSD hard disk. The total cost was $143. Since the description specifically mentioned pfSense, I figured it would be a perfect match for my usage requirements:


The computer shipped from Hong Kong. It took a little over a week to arrive. But, given that it was free shipping, I did not complain. I was very excited when it finally arrived.

Installing pfSense

When the PC arrived, I plugged it into a monitor using a VGA cable. I also plugged in a dongle for a wireless USB keyboard/mouse combo. I plugged one network card into my cable modem. Note that it is necessary to restart your cable modem whenever you plug new hardware into it. I plugged a second network card into a gigabit switch that was connected to my home network.

On an existing computer, I then used Rufus (https://rufus.ie/en_IE.html) to create a bootable flash drive with the pfSense installer. I downloaded pfSense from https://www.pfsense.org/download/. I chose the following options:


When I inserted the bootable USB drive into the computer, the computer booted into Windows. It was preloaded with Windows. To get the pfSense installer to load, I had to go to the BIOS and tell it to boot from the USB drive instead of the built in hard disk. Once I updated the BIOS, the pfSense installer loaded. I accepted the defaults and finished the installation. It went very quickly.

Thursday, November 1, 2018

Creating a Fedora 28 Server Linux Router - Part 3

Installing SoftEther

SoftEther is a performant VPN server package that is my preferred VPN software. There are not packages directly available for Fedora, so it is necessary to download it from the SoftEther website. It can be installed by following the steps below.


Install Dependencies


dnf -y install make gcc zlib-devel openssl-devel readline-devel ncurses-devel

Download

wget https://github.com/SoftEtherVPN/SoftEtherVPN_Stable/releases/download/v4.25-9656-rtm/softether-vpnserver-v4.25-9656-rtm-2018.01.15-linux-x64-64bit.tar.gz
tar xvfz softether-vpnserver-v4.25-9656-rtm-2018.01.15-linux-x64-64bit.tar.gz

Compile

cd vpnserver
make

Move

cd ..
mv vpnserver /usr/local/

Set Permissions

cd /usr/local/vpnserver
chmod -R 600
chmod 700 vpnserver
chmod 700 vpncmd

Disable SELinux


vi /etc/selinux/config

Update the following line:

SELINUX=disabled

Reboot the computer. Now, create a systemd file:

vi /etc/systemd/system/vpnserver.service

Add the following contents:

[Unit]
Description=SoftEther VPN Server  
After=network.target auditd.service  
ConditionPathExists=!/usr/local/vpnserver/do_not_run

[Service]
Type=forking  
EnvironmentFile=-/usr/local/vpnserver  
ExecStart=/usr/local/vpnserver/vpnserver start  
ExecStop=/usr/local/vpnserver/vpnserver stop  
KillMode=process  
Restart=on-failure

# Hardening
PrivateTmp=yes  
ProtectHome=yes  
ProtectSystem=full  
ReadOnlyDirectories=/  
ReadWriteDirectories=-/usr/local/vpnserver  
CapabilityBoundingSet=CAP_NET_ADMIN CAP_NET_BIND_SERVICE CAP_NET_BROADCAST CAP_NET_RAW CAP_SYS_NICE CAP_SYS_ADMIN CAP_SETUID

[Install]
WantedBy=multi-user.target

Enable and Start the Service

systemctl enable vpnserver
systemctl start vpnserver

Wednesday, October 31, 2018

Creating a Fedora 28 Server Linux Router - Part 2

This is part 2 of my multi-part series in configuring router using Fedora 28 Server. It is a continuation of http://techninotes.blogspot.com/2018/10/creating-fedora-28-server-linux-router.html. This article will cover the following steps:
  • Configuring the Firewall
  • Installing and Configuring bind
  • Installing and Configuring 

Configuring the Firewall

Enable IP Forwarding


Normally, to enable IP forwarding, you would add an entry to /etc/sysctl.conf. With Fedora 28, however, it replaces that file each time it starts up. Instead, it is necessary to add the entry to a file in the /etc/sysctl.d/99-sysctl.conf:

vi /etc/sysctl.d/99-sysctl.conf

Add the following line to the end to ensure IP forwarding is enabled on boot:

net.ipv4.ip_forward=1

To enable IP forwarding immediately, run the following command:

sysctl -w net.ipv4.ip_forward=1

Configure the Firewall


Before configuring the firewall, you need to first identify the names of the private and public network cards. Part 1 of this series goes further into this. Once you have the names, we can set up our firewall rules. In my case, I have the following setup:

eth0 - External Internet Access
eth1 - Internal Network

First, make external be the default zone:

firewall-cmd --set-default-zone external

To verify the default zone is set, run the following command:

firewall-cmd --get-default-zone

Now, assign eth1 to the internal zone:

firewall-cmd --zone=internal --change-interface eth1

To view all zone assignments, run the following command:

firewall-cmd --get-active-zones

Next, let's allow all traffic on the internal zone:

firewall-cmd --permanent --zone=internal --set-target=ACCEPT

Finally, set up masquerading on the external interface. This is what causes the router to forward IPv4 traffic to the Internet:

firewall-cmd --permanent --direct --add-rule ipv4 nat POSTROUTING 0 -o eth0 -j MASQUERADE
firewall-cmd --permanent --direct --add-rule ipv4 filter FORWARD 0 -i eth1 -o eth0 -j ACCEPT
firewall-cmd --permanent --direct --add-rule ipv4 filter FORWARD 0 -i eth0 -o eth1 -m state --state RELATED,ESTABLISHED -j ACCEPT

Installing and Configuring Bind


dnf -y install bind bind-utils

Now, you need to update named.conf:

vi /etc/named.conf

Add your server's private IP address to the listen-on line:

listen-on port 53 { 127.0.0.1; 192.168.1.1; };

Add your private subnet to the allow-query line:

allow-query { localhost; 192.168.1.0/24; };

Add an allow-recursion statement and add the upstream DNS servers to a forwarders entry below the allow-query line:

allow-query { localhost; 192.168.1.0/24; };
allow-recursion { localhost; 192.168.1.0/24; };
forwarders { 8.8.8.8; 8.8.4.4; }

Add a forward statement under the recursion line:

recursion yes;
forward only;

Restart the service:

systemctl restart named

Set the service to start on boot:

systemctl enable named

Installing and Configuring DHCP


dnf -y install dhcp

Add a subnet to dhcpd.conf:

vi /etc/dhcp/dhcpd.conf

Enter the following lines:

subnet 192.168.1.0 netmask 255.255.255.0 {
    option domain-name-servers 192.168.1.1;
    option domain-name "mynet.local";
    option routers 192.168.1.1;
    range 192.168.1.100 192.168.1.245;
}

Restart the service:

systemctl restart dhcpd

Set the service to start on boot:

systemctl enable dhcpd


Tuesday, October 30, 2018

Creating a Fedora 28 Server Linux Router - Part 1

Linux has some very powerful routing capabilities. It is also very performant and it uses very few resources. These, and countless other benefits make it an excellent choice for a router operating system. Choosing a distribution can be a challenge, however.

I have built routers using pfSense, DD-WRT, Ubuntu, Debian, and CentOS. Each of these has pros and cons. pfSense and DD-WRT have web applications that can be used to configure the router. Ubuntu and Debian are easy to get up and running quickly. CentOS has wide support. Fedora has much newer packages available, and also has wide support.

As a side note, Ubuntu is built on top of Debian. CentOS is built on top of Fedora. Debian and Fedora have been around for a very long time, and they have very large numbers of users.

After having created so many different routers, my current favorite is Fedora. It has been very predictable and stable - both are good qualities to have in a router operating system. This article will take you step-by-step through the process of building a router using Fedora.

Prerequisites


Here are my recommended prerequisites. I am just making these up based on past experiences:
  • 16 GB Hard Disk
  • 2 GB RAM
  • 2 CPU Cores
  • 2 Network Cards

Installation


Download and install Fedora Server from https://getfedora.org/en/server/. If you plan on booting from a USB drive, download the Fedora Media Writer from https://getfedora.org/en/workstation/download/. Note that although the page says Download Fedora 28 Workstation, the download link currently points to the Media Writer.


Post Installation Steps


Configure Static IP Address


Fedora 28 stores its network configuration scripts under /etc/sysconfig/network-scripts. For each network card that is detected, a script will be created with the prefix
ifcfg-. For example, my computer has two network cards: eth0 and eth1. eth0 is connected to the public Internet and eth1 is connected to my private network. Two files exist called ifcfg-eth0 and ifcfg-eth1.

To configure an IP address for a given interface, open the appropriate file in a text editor. By default, it is set to use DHCP to obtain an IP address. Add the following entries:

IPADDR=192.168.1.1
PREFIX=24


Install Updates


To install all available updates, type dnf upgrade at the console.


Sunday, October 14, 2018

Ubuntu 18.04 Won't Resolve DNS

DNS Resolution Failure and Fix

I noticed after doing both fresh installations and upgrades of Ubuntu Server 18.04, DNS was either really slow, or it would not resolve at all. The symptoms were random. I searched high and low on the Internet. It took me a long time to find a solution.

By default, when installing Ubuntu, it will create a symbolic link from /etc/resolv.conf to /run/systemd/resolve/stub-resolv.conf. If DNS resolutions are failing, one solution is to remap this link. Point it to to /run/systemd/resolve/resolv.conf instead.  The following commands will move the link:

sudo rm /etc/resolv.conf
sudo ln -s /run/systemd/resolve/resolv.conf /etc/resolv.conf

If you are experiencing long delays while performing DNS lookups, the previous commands should resolve the issue. To see what file your symbolic link is pointing to, run the following command.

ls -al /etc/resolv.conf

If it points to /run/systemd/resolve/resolve.conf then it should work just fine.

Thursday, October 19, 2017

Migrating Existing Virtual Machines to NVMe in VMWare Workstation 14

Today, I downloaded a trial version of VMWare Workstation 14. The release notes mention a new "NVMe" hard disk controller. Having had hard disk performance issues in the past, I was excited to try it out. I decided to port one of my development virtual machines to the new controller. I was able to do so successfully. To do this, follow the instructions below:

To begin, "upgrade" the virtual machine hardware version from the Settings tab:


In the wizard, select Workstation 14.x:


Once the virtual machine has been upgraded, ensure the new drivers are loaded into Windows. To do this, add a second hard disk, that uses the NVMe controller. You can delete the hard disk when the upgrade is complete. But, add it for now. Start by clicking, Edit virtual machine settings:

From there, click the Add button:


Choose Hard Disk:


Choose NVMe:


Choose Create a new virtual disk:


If you want the disk to be a single file, be sure to select Store virtual disk as a single file:


Finally, give the disk a name and click the Finish button:


Click the OK button in the Virtual Machine Settings page to save your changes. Turn on the virtual machine. Once it has turned on, log into Windows. In VMWare Workstation, select VM->Upgrade VMWare Tools. A virtual CD will be inserted into the CD-ROM drive. Run the setup.exe program to install the new drivers. Allow the virtual machine to reboot.

Once the virtual machine has rebooted, the new NVMe drivers will have been loaded. At this point, shut down Windows. Then, close the virtual machine in VMWare Workstation. The next step is to hand edit the .vmx file for the virtual machine. Make a backup of the file. Then, open it in a text editor, such as Notepad++.

In the text editor, search for scsi0. Remove all lines for the scsi0 controller. Take note of the name of the hard disk file, you will need it later. It will end with the .vmdk extension. In the screenshot below, mine is BRN-CLIENT02.vmdk:


 Now, scroll to the bottom of the file. You will find the new NVMe hard disk:


Change any occurrences of nvme0:0 to nvme0:1 to make that drive the second hard disk on the NVMe controller. Then, insert your original hard disk on nvme0:0:


Save the file. Open the virtual machine in VMWare Workstation. Boot it up. You are now using the NVMe controller for your hard disk!

NOTE: If you are using shared virtual machines, the VMWare Workstation Server service caches the .vmx file once you load it. Be sure to also stop that service prior to editing the .vmx file. Stopping the service will not shut down any running virtual machines. Start it back up once the file has been modified.


Wednesday, September 7, 2016

Migrating from VMWare Workstation to Hyper-V

My Reason For Migrating From VMWare Workstation to Hyper-V

I am a long-time user of VMWare Workstation. I have been using it since version 6.0. It has been used to run my personal domain controller, my various development computers, and some test environments. Needless to say, I depend heavily on virtualization. I was very disappointed at some news I recently heard about VMWare.

With the announcement of layoffs at VMWare that took place in January, I began forming a plan for the migration to Hyper-V. VMWare later announced they would continue to maintain their products. However, their plan is to completely outsource the development of those products.

Having worked with large companies that have outsourced some of their development, I have learned first-hand how the quality of a product decreases as the development force of that product is moved off site. My decision to move away from VMWare is to ensure that I continue to experience a hypervisor that is considered a first-class citizen by its owners, and will continue to receive the best attention from the most-skilled developers available. It is my experience that this is an objective that is simply not possible when the development of a product is completely outsourced.

This month, I finally completed my migration of over 20 virtual machines. It was a lot of work. Here are some of the challenges I ran into:

Converting the Virtual Machine

  1. The first challenge is to convert the hard disk. I found the easiest method is to do this is to use StarWind V2V Converter. Run it from the command-line, or it will require that there is enough free space for expanded virtual disks - even if they are dynamic.

Note that it was not necessary for me to uninstall VMWare Tools prior to the conversion. I just shut down the guests and ensured there were no snapshots.

Setting Up Networking

The networking set up is not quite so simple if you are using Network Address Translation (NAT). Using Windows 10, it is necessary to set this up using PowerShell:
  1. New-VMSwitch -SwitchName "SwitchName" -SwitchType Internal
  2. New-NetIPAddress -IPAddress <NAT Gateway IP> -PrefixLength <NAT Subnet Prefix Length> -InterfaceIndex <ifIndex>
  3. New-NetIPAddress -IPAddress 192.168.0.1 -PrefixLength 24 -InterfaceIndex 24
  4. New-NetNat -Name <NATOutsideName> -InternalIPInterfaceAddressPrefix <NAT subnet prefix>
     

Working With DPI

Windows prevents users from changing DPI settings in a Remote Desktop session. Annoyingly, this also happens to extend to Hyper-V sessions. In order to change DPI, it is necessary to either hack the registry, or to gain access to the console session. I personally prefer the second option.

To gain access to the console session, install TightVNC. After installing the server and setting it up, install the client on another machine. With the client, log into the server. It will then be possible to change DPI settings.